Deploying your own Google Colab from home
Recently, I found myself doing ML projects from my laptop while my GPU was wasting away at home. In this blog post, I will walkthrough my setup to solve this with Docker, Traefik, Jupyter, and Tailscale.
The main gain is the ability to do finetuning (or any other FLOP-intensive DL tasks) using my home computer into a VPS serving a Jupyter webapp - and by extension, any other computers I owe. Even that old laptop I bought 10 years ago. We have 2 security measures: encryption with https protocol and attack-surface-reduction with VPN.
Prerequisites
Before we begin, ensure you have the following installed and configured:
- Docker and Docker Compose: A Docker installation for your OS is needed. If you are somewhat familiar with networking, this setup is a multi-container/single-node setup. We can implement multi-node with k8s/k3d at a later time.
- Tailscale: Sign up for a free Tailscale account and install it on your local machine and whichever devices you wish to add. You will need to manually add your devices into the VPN from the Tailscale webpage. For personal uses, Tailscale is completely free!
The Architecture
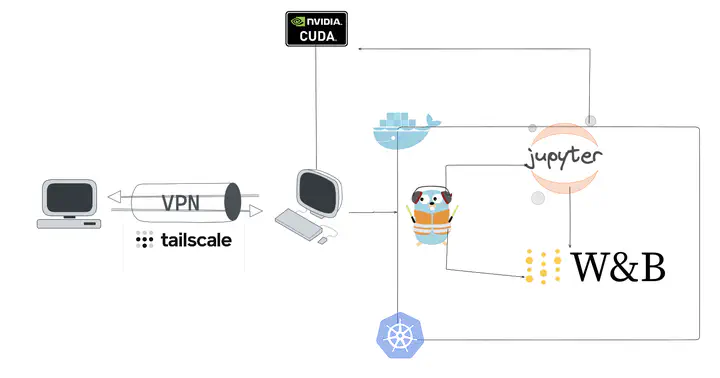
Our setup will consist of three main components orchestrated by Docker Compose:
- Jupyter: The main webapp for your data science and ML project needs. If you have only ran Jupyter on localhost before, this will be your first time deploying it to be accessed from another machine.
- Traefik: A cloud-native reverse proxy that will automatically discover and route traffic to our Jupyter container. It acts as the gateway and load balancer to route traffic correctly to the Jupyter container. It will be configured to listen for traffic coming from our secure Tailscale network.
- Tailscale: Under the hood, this is a VPN service that implements Wireguard for you with mesh networking. This will create a secure network (a "tailnet") between your registered devices. While this is cumbersome, it also ensures the Jupyter instance will only be accessible from devices you manually added to the tailnet.
The docker-compose.yml File
Let's dive into the core of our setup, the docker-compose.yml file. This file will define and configure our three services.
services:
    traefik:
        image: "traefik:v2.10"
        container_name: "traefik"
        command:
            - "--api.insecure=true"
            - "--providers.docker=true"
            - "--providers.docker.exposedbydefault=false"
            - "--entrypoints.web.address=:80"
        ports:
            - "8080:8080" # Traefik Dashboard (for debugging, you can access it at localhost:8080 after spun up)
        volumes:
            - "/var/run/docker.sock:/var/run/docker.sock:ro" #mount a virtual drive onto your hard drive
        networks:
            - proxy_traefik # Docker compose will now create a mini-cluster (or LAN) with the name of "proxy_traefik"

    #now that Docker has Traefik spun up in its own Docker "LAN" of proxy_traefik, we spin up the Jupyter component and add it to the "LAN"
    jupyter:
        image: "jupyter/scipy-notebook:latest"
        container_name: "jupyter"
        command: ["start.sh", "jupyter", "lab", "--NotebookApp.token='jupyter'"] #prompted password is jupyter at landing page
        environment:
            - JUPYTER_ENABLE_LAB=yes
        labels: #by adding these labels, we are telling Docker to inform Traefik that this component is to join the "LAN" designated in networks below and that Traefik will be the reverse proxy routing traffic to it
            - "traefik.enable=true"
            - "traefik.http.routers.jupyter.rule=Host(`your-home-machine.tail.ts.net`)" # Use your Tailscale magicDNS domain name
            # when you are routed to your home machine from within the VPN, the request is resolved by your computer towards Docker desktop which again reroute you to the Traefik service to attempt to resolve. As Traefik kept track that the Jupyter server told it to route any `your-home-machine.tail.ts.net` traffic towards itself, it will then reroute using the docker compose "LAN" internal IP address towards Jupyter. This finally connects us to the Jupyter running in a Docker composed container in the desktop.
            # by the way, note that we can also tell Traefik to resolve for Host(`your-home-machine.tail.ts.net`) && PathPrefix(`/app-slug`) towards your own selfhosted app! Unfortunately, some apps may bug out with static assets referencing with this approach so be mindful.
            - "traefik.http.routers.jupyter.entrypoints=websecure" #we tell Traefik to redirect to https for any access repquest
            - "traefik.http.services.jupyter.loadbalancer.server.port=8888" #we tell Traefik to LB towards port 8888 of the container which is Jupyter's access port by default
        networks:
            - proxy
        restart: unless-stopped

networks:
    proxy_traefik:
      name: proxy_traefik
Breaking Down the Configuration
Let's examine each service in the docker-compose.yml file.
Traefik
image: "traefik:v2.10": We are using a specific version of the official Traefik image.command: These flags configure Traefik:--api.insecure=true: This exposes the Traefik dashboard on port 8080 for debugging purposes. For production environments, you should secure this with a password.--providers.docker=true: This tells Traefik to look for container labels to discover services.--providers.docker.exposedbydefault=false: We will explicitly enable Traefik for our Jupyter container using labels.--entrypoints.web.address=:80: This defines an entry point namedwebon port 80.
ports: - "8080:8080": This maps the Traefik dashboard port to the host.volumes: - "/var/run/docker.sock:/var/run/docker.sock:ro": This gives Traefik read-only access to the Docker socket, allowing it to listen for container events.networks: - proxy: Places the Traefik container on our customproxynetwork.
Jupyter
image: "jupyter/scipy-notebook:latest": We're using a Jupyter image that includes common scientific computing libraries.command: ["start.sh", "jupyter", "lab", "--NotebookApp.token=''"]: This command starts the Jupyter Lab interface and disables token authentication. Since we are securing access with Tailscale, we can simplify the Jupyter setup. Do not do this if your service is exposed to the public internet.environment: - JUPYTER_ENABLE_LAB=yes: Ensures Jupyter Lab is enabled.labels: This is where the magic of Traefik's auto-discovery happens:"traefik.enable=true": Tells Traefik to expose this container."traefik.http.routers.jupyter.rule=Host(`jupyter-server`)": This creates a router namedjupyterand tells Traefik to route traffic for the hostnamejupyter-serverto this container. This hostname matches the hostname we set for our Tailscale container."traefik.http.routers.jupyter.entrypoints=web": Associates this router with thewebentry point we defined in the Traefik configuration."traefik.http.services.jupyter.loadbalancer.server.port=8888": Informs Traefik that the Jupyter service is running on port 8888 inside the container.
networks: - proxy: Places the Jupyter container on theproxynetwork, allowing Traefik to route traffic to it.restart: unless-stopped: Ensures the Jupyter container restarts if it crashes.
Bringing It All Up
- Signup your Tailscale account athttps://tailscale.com.
- Download Tailscale app on whichever desktop, laptop, or phone you want to add to the VPN. Manually add the device to the VPN from the Tailscale webpage. Copy the magicDNS url to be pasted into Jupyter's compose yml file.
- In your home desktop CLI, run 'tailscale serve --bg' for serving https onto the VPN (specifically, port 443 will listen to https routed from the Tailscale url).
- Create a directory for your project and save the
docker-compose.ymlfile inside it. - Run in CLI:
docker compose up --build -d
This will pull the necessary images and start the containers in the background.
Accessing Your Secure Jupyter Lab
Once the containers are running, you can access your Jupyter Lab instance.
- Ensure Tailscale is up and happy on your local machine .
- Open your web browser and navigate to the url you had Traefik pointing towards your Jupyter instance.
You should be greeted by the Jupyter Lab interface, accessible only from devices on your Tailscale network. The only bottleneck now is the latency and bandwidth your ISP facilitates for your home Internet!
TL;DR
Use Tailscale - it's free, it works, and it's robust. Tell your Traefik to route from Tailscale's provided url. Copy/paste the docker-compose for a quick spin up. Have fun!